Memory Dump erstellen: Unterschied zwischen den Versionen
Aus Wiki-WebPerfect
Admin (Diskussion | Beiträge) K |
Admin (Diskussion | Beiträge) |
||
| Zeile 15: | Zeile 15: | ||
=== Full Memory Dump === | === Full Memory Dump === | ||
| − | Mit folgenden Befehlen kann der "Full Memory Dump" aktiviert werden | + | ==== Vorbereitung ==== |
| + | Damit ein Full Memory Dump geschrieben werden kann müssen folgende zwei Punkte im Vorhinein gemacht/abgeklärt werden: | ||
| + | *Genug Speicherplatz bei der Dump-Location (Default Laufwerk C:) freilassen -> Memory * 2 + 256MB | ||
| + | *Virtual Memory auf fixed setzen -> Memory * 2 + 256MB | ||
| + | |||
| + | |||
| + | Mit folgenden Befehlen kann der "Full Memory Dump" aktiviert werden und das Virtual Memory auf fixed gesetzt werden | ||
| + | Nach dem ausführen des Befehls muss das System neugestartet werden. | ||
<source lang="powershell"> | <source lang="powershell"> | ||
| + | # Set Registry-Settings | ||
Set-ItemProperty –Path HKLM:\System\CurrentControlSet\Control\CrashControl –Name CrashDumpEnabled –value 1 | Set-ItemProperty –Path HKLM:\System\CurrentControlSet\Control\CrashControl –Name CrashDumpEnabled –value 1 | ||
Set-ItemProperty –Path HKLM:\System\CurrentControlSet\Control\CrashControl –Name NMICrashDump –value 1 | Set-ItemProperty –Path HKLM:\System\CurrentControlSet\Control\CrashControl –Name NMICrashDump –value 1 | ||
Remove-ItemProperty –Path HKLM:\System\CurrentControlSet\Control\CrashControl –Name FilterPages | Remove-ItemProperty –Path HKLM:\System\CurrentControlSet\Control\CrashControl –Name FilterPages | ||
| + | |||
| + | # Check Total Memory Size for virtual Memory | ||
| + | $MemoryInGB = [math]::Round((Get-Ciminstance Win32_OperatingSystem).TotalVisibleMemorySize/1mb,2) | ||
| + | $MemoryInMB = $MemoryInGB * 1024 | ||
| + | |||
| + | # Set virtual Memory to fixed and with the right Value (Memory * 2 + 256MB) | ||
| + | $computersys = Get-WmiObject Win32_ComputerSystem -EnableAllPrivileges; | ||
| + | $computersys.AutomaticManagedPagefile = $False; | ||
| + | $computersys.Put(); | ||
| + | $pagefile = Get-WmiObject -Query "Select * From Win32_PageFileSetting Where Name like '%pagefile.sys'"; | ||
| + | $pagefile.InitialSize = ($MemoryInMB + 256); | ||
| + | $pagefile.MaximumSize = ($MemoryInMB + 256); | ||
| + | $pagefile.Put(); | ||
| + | |||
| + | # Message | ||
| + | Write-Host "To apply the settings reboot the system" -ForegroundColor Green | ||
</source> | </source> | ||
Version vom 22. September 2017, 16:46 Uhr
Bevor die Memory Dumps aktiviert werden bzw. die Registry-Setting geändert werden, empfehle ich die aktuellen Settings zu merken um dies danach wieder rückgängig zu machen!
Inhaltsverzeichnis
[Verbergen]Location des Dumps ändern (Beispiel Laufwerk X:)
Set-ItemProperty –Path HKLM:\System\CurrentControlSet\Control\CrashControl –Name DumpFile –value X:\MEMORY.DMPDump Konfigurationen/Arten
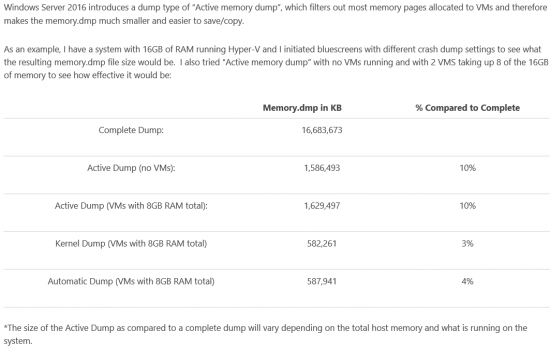
Active Memory Dump
Mit folgenden Befehlen kann der "Active Memory Dump" aktiviert werden. Nach dem ausführen des Befehls muss das System neugestartet werden.
Set-ItemProperty –Path HKLM:\System\CurrentControlSet\Control\CrashControl –Name CrashDumpEnabled –value 1
Set-ItemProperty –Path HKLM:\System\CurrentControlSet\Control\CrashControl –Name FilterPages –value 1
Full Memory Dump
Vorbereitung
Damit ein Full Memory Dump geschrieben werden kann müssen folgende zwei Punkte im Vorhinein gemacht/abgeklärt werden:
- Genug Speicherplatz bei der Dump-Location (Default Laufwerk C:) freilassen -> Memory * 2 + 256MB
- Virtual Memory auf fixed setzen -> Memory * 2 + 256MB
Mit folgenden Befehlen kann der "Full Memory Dump" aktiviert werden und das Virtual Memory auf fixed gesetzt werden
Nach dem ausführen des Befehls muss das System neugestartet werden.
# Set Registry-Settings
Set-ItemProperty –Path HKLM:\System\CurrentControlSet\Control\CrashControl –Name CrashDumpEnabled –value 1
Set-ItemProperty –Path HKLM:\System\CurrentControlSet\Control\CrashControl –Name NMICrashDump –value 1
Remove-ItemProperty –Path HKLM:\System\CurrentControlSet\Control\CrashControl –Name FilterPages

# Check Total Memory Size for virtual Memory
$MemoryInGB = [math]::Round((Get-Ciminstance Win32_OperatingSystem).TotalVisibleMemorySize/1mb,2)
$MemoryInMB = $MemoryInGB * 1024

# Set virtual Memory to fixed and with the right Value (Memory * 2 + 256MB)
$computersys = Get-WmiObject Win32_ComputerSystem -EnableAllPrivileges;
$computersys.AutomaticManagedPagefile = $False;
$computersys.Put();
$pagefile = Get-WmiObject -Query "Select * From Win32_PageFileSetting Where Name like '%pagefile.sys'";
$pagefile.InitialSize = ($MemoryInMB + 256);
$pagefile.MaximumSize = ($MemoryInMB + 256);
$pagefile.Put();

# Message
Write-Host "To apply the settings reboot the system" -ForegroundColor Green
Dump generieren
- Der Dump wird automatisch beim nächsten Bluescreen erstellt.
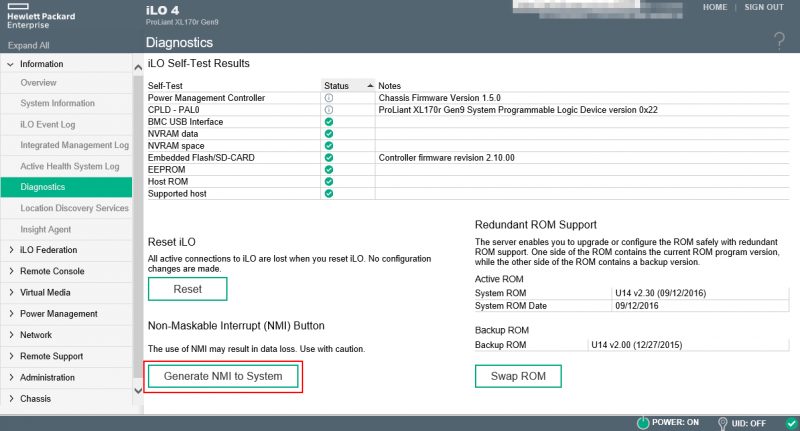
- Dies kann mittels einem NMI auch forciert ausgeführt werden. (Siehe Bild)
- Eine weitere Möglichkeit wäre die NotMyFault64.exe von den Sysinternals-Tools auf das Zielsystem zu kopieren und diese auszuführen. Ähnlich wie NMI führt dies ebenfalls einen "Bluescreen" aus.

